I’ve been working for awhile on a braised chicken thigh that was tender, but still had that crispy skin I love. I think I’ve come up with a recipes I like, so of course I had to try a Buffalo version of the Super Bowl.
8 chicken thighs, bone-in, skin-on
1/2 cup hot sauce (Frank’s RedHot Original in this case)
1 tablespoon Worcestershire sauce
1 tablespoon honey
1 tablespoon granulated garlic
1 tablespoon white vinegar
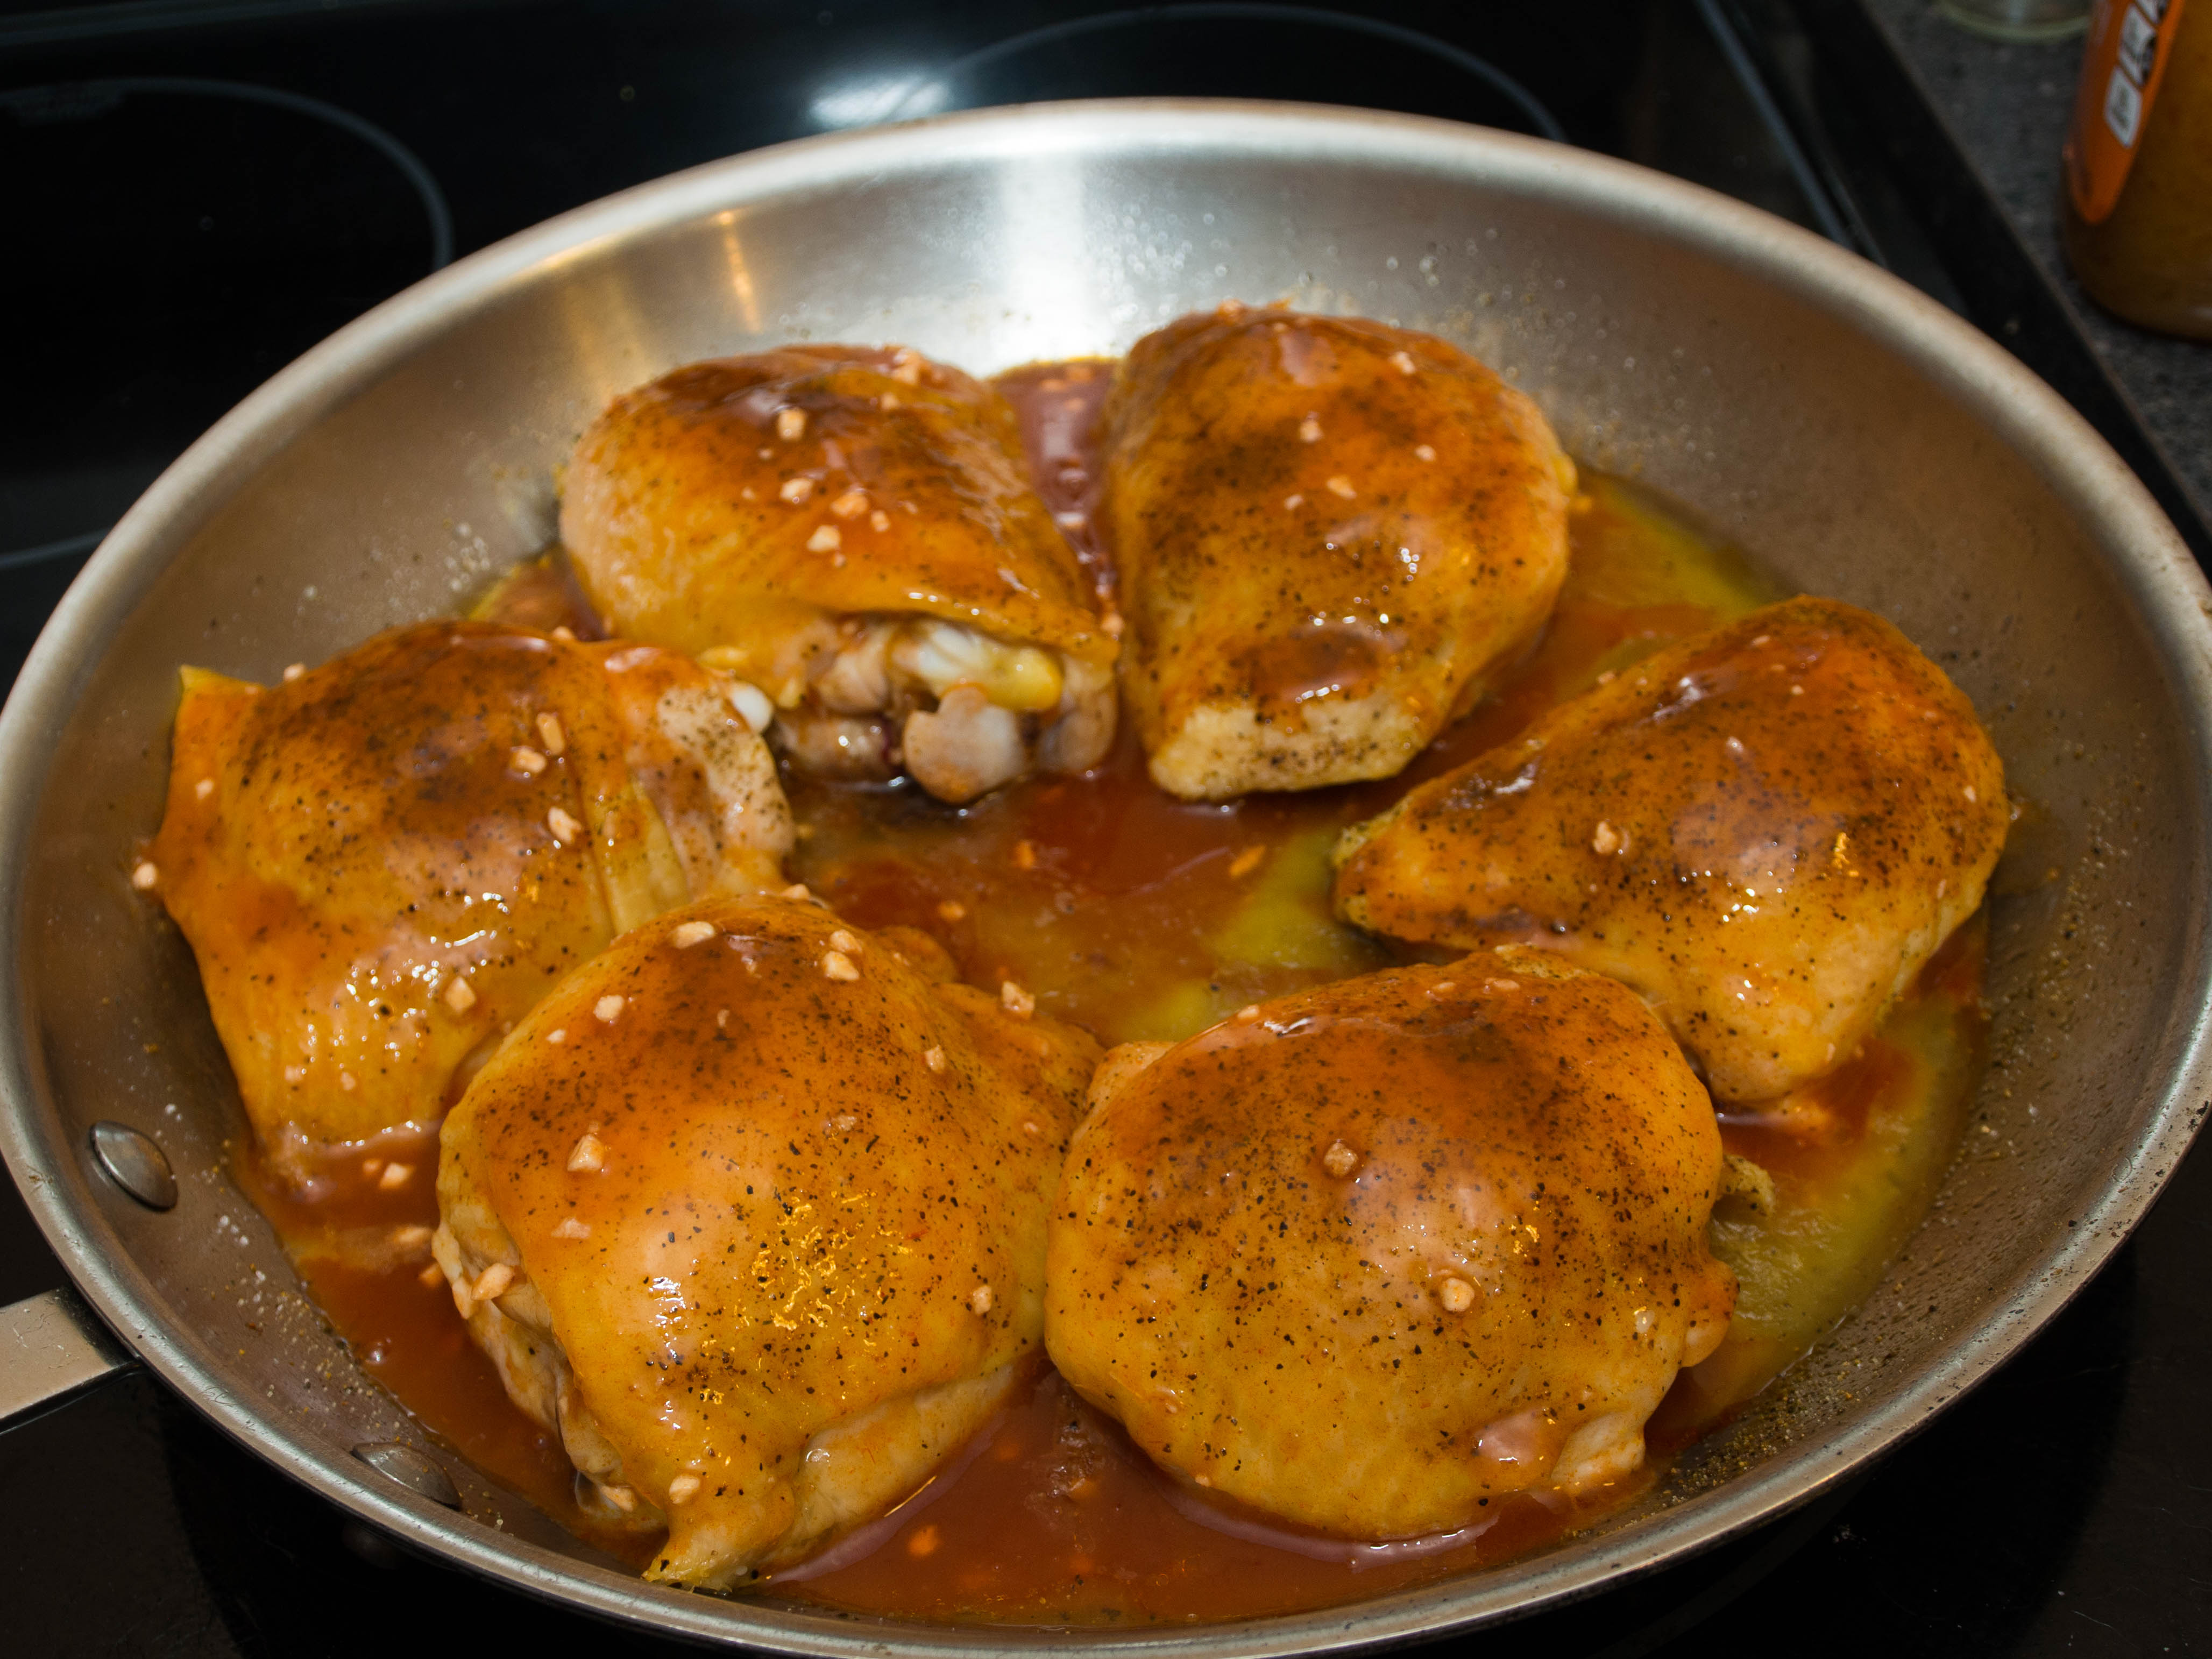
Preheat your oven to 350°F. Lightly oil a 12-inch fry pan and arrange the chicken thighs in it skin side up. Season lightly with salt and pepper.
Roast the thighs for 30 minutes, or until the skin has started to brown and crisp.
While the chicken is roasting, make the sauce by combining the hot sauce, Worcestershire sauce, honey, garlic, and vinegar. Stir until the honey dissolves.
Remove chicken from oven and pour the sauce over the thighs. Return to oven for 15 minutes.
Remove the chicken and flip the thighs skin side down. Baste with the pan sauce and return for 15 minutes.
Flip the chicken back skin side up, baste with sauce, and let braise another 15 minutes.
Remove chicken and let rest 10 minutes.
I plated the thighs on top of a dollop of bleu cheese dressing and topped them with a little pan sauce.
The Verdict:
The thighs came with a crispy skin and an almost fall-apart meat. The sauce wasn’t too spicy and had a good balance of sweet and tangy. The chicken juices gave the sauce a nice richness, but also cut the heat a bit. Next time I would hit it with a little cayenne.
1 1/2 pounds chicken wings
1/4 cup mustard (I did 50/50 spicy brown and dijon)
1/4 Louisiana-style hot sauce
1/2 cup honey
1 tablespoon of your favorite rub (Penzey’s Ruth Ann’s Muskego Ave Seasoning in this case)
1 tablespoon olive oil
1 tablespoon Worcestershire sauce
1 teaspoon garlic powder
1 teaspoon salt
Put wings in a large bowl and drizzle with olive oil. Toss to coat. Dust with the rub and then toss again. Set a cooling rack on a cookie sheet or jellyroll pan. Lay wings out on a rack and let them sit uncovered in the refrigerator for at least 2 hours, and preferably overnight to let the rub do its work and for the skin to dry out a bit.
Set your grill up for a raised direct cook at 350°F. On the Big Green Egg I used an extender to move the grate up to the level of the rim, putting the chicken further away from the heat.
When the grill is ready, put the wings on the grill and cook undisturbed for 30 minutes. Flip and cook for another 20 minutes, or until brown and crispy.
While the wings are cooking, make your sauce by combining the mustard, hot sauce, honey Worcestershire, garlic, and salt in a small saucepan. Stir to combine and bring to simmer. Remove from heat but keep warm.
Baste the wings on both sides with the sauce. Let them cook for another 10 minutes, then baste again.
Serve with bleu cheese dressing and/or any remaining sauce for dipping.
The Verdict:
Wings came out crispy and sticky. The sauce ended up a little too sweet for my tastes. Need a touch more heat and some acid to balance it out.
I had no use for Valentine’s Day this year, so I made up a batch of man food to drown my sorrows with.
Country-Style Ribs 1 1/2 pounds boneless country-style ribs
Rub of your choice (Dizzy Pig Dizzy Dust here)
Barbecue sauce
Season the ribs heavily on all sides with rub. Cover and stash in the fridge until the grill is ready.
Set your grill up for a raised direct cook at 250°F. On the Big Green Egg I didn’t use a plate setter to diffuse the heat, but did use an extender to raise the cooking grid up about 4 inches further from the heat.
Add your smoking wood (apple, in this case) to the grill and when the grill reaches 250°F and the smoke has turned blue, arrange the ribs on the cooking grate. Close the lid and let them cook, flipping every hour, until they reach 160°F internal (about 3 hours).
When the ribs hit 160°F internal, move them off to a flame-proof pan (I used a 9×13 roasting pan) and cover with a bout a cup of sauce. Turn ribs to coat and move the pan full of ribs back to the grill. Close the lid and let cook for an hour.
Check the ribs for doneness – they should be around 190°F internal and the meat should fall apart when you poke at it with a fork. Seal the pan with a sheet of aluminum foil and move off to an oven set on the lowest setting while you cook the wings.
Greek-ish Hot Wings 1 1/2 pounds chicken wings
Penzey’s Greek Seasoning
1/2 cup Frank’s hot sauce
Season wings with a good dusting of Greek seasoning and stash in the fridge on a cooling rack in a cookie sheet or jelly roll pan while you get the grill up to 350°F.
On the Big Green Egg I used the same raised direct setup I used for the ribs. But just opened the vents a bit to get the heat up.
When the grill is ready, put the wings on the grate skin side up and cook undisturbed for 20 minutes. Flip and cook for another 20 minutes. Flip back skin side up and cook another 20 minutes until golden and crispy.
Baste the wings on both sides with the sauce. Let them cook for another 10 minutes, then baste again before serving.
The Ribs Verdict:
Tasty hunks of meat, but they still were a little dry. I think my technique is sound, but the cut of meat might be too lean with not enough connective tissue to break down and get juicy.
The Wings Verdict:
Just straight up Frank’s and some Greek seasoning – nothing fancy but OMG they were good. The unadulterated Frank’s packs a little more heat than most Buffalo sauces I’ve made and that heat makes a big difference.
“Neither snow nor rain nor heat nor gloom of night stays…” sorry, that’s the USPS’s motto, but anyway, I’m not going to let a little cold come between me and some hot wings.
3 pounds chicken wings
Penzey’s Ruth Ann’s Muskego Ave Chicken/Fish Seasoning
1/3 cup butter
1/3 cup Sriracha hot sauce
1/3 cup honey
2-3 tablespoon Thai sweet chili sauce
1 tablespoon cider vinegar
1 tablespoon peanut oil
Toss wings in oil and then season heavily the Penzey’s seasoning or your favorite rub. Set a cooling rack on a cookie sheet or jellyroll pan. Lay wings out on a rack and let them sit uncovered in the refrigerator for at least 2 hours, and preferably overnight to let the rub do its work and for the skin to dry out a bit.
Set your grill up for a raised direct cook at 350°F. On the Big Green Egg I used an extender to move the grate up to the level of the rim, putting the chicken further away from the heat.
While the grill is eating up, combine the butter, hot sauce, honey, chili sauce, and vinegar in a small saucepan. Bring to a simmer, them remove from heat but keep warm.
When the grill is ready, put the wings on the grill and cook undisturbed for 30 minutes. Flip and cook for another 20 minutes, or until brown and crispy.
Baste the wings on both sides with the hot sauce. Let them cook for another 10 minutes, then baste again.
Serve with bleu cheese dressing for dipping.
The Verdict:
The sweet/hot/tangy flavor of the wings was perfect. Just when you thought one of the flavors would drown the other out, the others came through to create a great balance. I really like the brightness that the rub added.
Despite the cold, the BGE performed like a champ. I noticed no change in cooking times at all.
I’ve been looking for a simple chicken marinade and found a 4-ingredient one over at NoBIGGIE. Of course I had to play around with it a little bit, but that’s part of the joy of cooking.
8 chicken thighs, boneless/skinless
1/2 cup raw or brown sugar
1/2 cup peanut oil
1/4 cup cider vinegar
1/4 cup gluten-free soy sauce
1-2 tablespoons Sriracha hot sauce
4 flat, wooden skewers
Make the marinade by combining the brown sugar, oil, vinegar, soy sauce, and hot sauce. Stir until the sugar dissolves.
Put the thighs in a zip-top bag and pour the marinade over them. Turn to coat, then squeeze the air out of the bag, seal it up, and stash in the fridge for at least 4 hours (overnight is even better). Turn the bag every so often to make sure all the pieces get a coated in the marinade.
Set your grill up for a direct cook over high (400°F) heat. Put the skewers in a pan of water to soak.
When the grill is ready, thread two thighs onto each skewer. Grill chicken about 10 minutes per side or until the internal temp hits at least 180°F and the meat gets a good crispy char on it.
Remove the skewers from the grill and let rest 10 minutes before serving. I put these over some sesame noodles and roasted peppers.
The Verdict:
I really liked the tangy, sweetness that the marinade gave the chicken. Adding the Sriracha gave it a nice bump of heat. But I don’t know that the oil really brought anything to the party other than some flare ups. Next time I would skip the peanut oil and go with maybe a couple of tablespoons of sesame oil.
Combine the salt, herbs, and spices in a small bowl. Prep the chicken by removing the giblets and trimming off any excess fat or skin. Gently loosen the skin around the breast and thighs. Use a spoon to scoop about half the rub under the skin, spreading it out evenly. Dust the outside of the bird with the remaining rub.
Move the chicken to a pan with a rack in it and stash uncovered in the fridge for at least an hour (overnight is even better) to let the skin dry out a bit and the rub do its magic.
Set up your grill for an indirect cook over low (300°F) heat. On the Big Green Egg I used an inverted plate setter (convEGGtor) to defuse the heat.
Add a little wood for smoke, but go easy because chicken will soak up a lot of it. I used a small hunk of apple.
Roast the chicken until the breast hits 165°F internal (about 1 1/2 hours). Remove from grill and let rest 10 minutes before carving.
The Verdict:
Lowering the roasting temperature gave more time for the smoke to flavor the bird while still keeping the skin crisp. Leftovers became a chicken and kielbasa stew.
I have to admit that I was more than a little ooged out by the mayonnaise-based marinade used in The Grillin’ Fools’ Ultimate Guide to Grilled Chicken. Raw chicken soaking in a slimy mayo bath – yech. However, their results did look mighty tasty, and I have been looking for something new to do with chicken. So here goes….
12 bone-in/skin-on chicken thighs
1 cup mayonnaise
1/4 cup of your favorite rub (Plowboy’s Yardbird in this case)
Wearing food-safe gloves (cuts way down on the gross factor), combine the mayo and the rub. Slather both sides of the thighs with the marinade and toss into a zip-top bag. Cover with any remaining marinade and toss to coat. Squeeze the air out of the bag, seal it up, and stash in the fridge for at least 4 hours (overnight is even better). Turn the bag every so often to make sure all the pieces get a coated in the marinade.
Just before you are ready to fire up the grill, remove the thighs from the marinade and give them a dash of rub on each side. Arrange them on a rack set over a pan (I used a 9×13 baking rack) and return to the fridge uncovered. This will help remove any excess moisture and crisp up the skin.
Set your grill up for an indirect cook at medium (350°F) heat. I used a plate setter on the Big Green Egg to give me nice diffused heat and prevent flare ups.
When the grill is up to temp, arrange the thighs on the grate skin side up. Close the lid and let it cook for 20 minutes. Flip and cook skin-side down for 20 minutes. Flip again and cook skin-side up until the chicken is done – 180°F internal in the thickest part of the thigh.
Remove chicken from grill and let rest 10 minutes before serving.
The Verdict:
It’s pretty amazing just how juicy these thighs cooked up. It was almost like they had been braised, but the skin was still nice and crispy. The flavor of the rub came though nicely, but any mayo taste had completely melted away. They were some of the best thighs I think I’ve ever made – well worth the slime.
I love hot wings and playoff time is as good an excuse as any to fire up a batch. This time I went sweet and sticky with most of the heat coming from sriracha (aka rooster sauce).
12 chicken wings
Juice of 1 orange (about 1/4 cup)
2 tablespoons Thai sweet chili sauce
2 tablespoons soy sauce
2 tablespoons rice wine vinegar
2 tablespoons honey
1-2 tablespoons sriracha
1 tablespoon sesame oil
1 tablespoon fish sauce
Combine the juice, chili sauce, soy sauce, vinegar, honey, sriracha, oil, and fish sauce. Put the wings in a zip-top bag and pour the marinade over them. Turn to coat, then squeeze the air out of the bag, seal it up, and stash in the fridge for at least 4 hours (overnight is even better). Turn the bag every so often to make sure all the pieces get a coated in the marinade.
Set a cooling rack on a cookie sheet or jelly roll pan. Reserve the marinade and move the to the rack and let them sit uncovered in the refrigerator for at least 2 hours, and preferably overnight to let the skin to dry out a bit.
Set your grill up for a raised direct cook at 350°F. On the Big Green Egg I used an extender to move the grate up to the level of the rim, putting the chicken further away from the heat.
When the grill is ready, put the wings on the grill and cook undisturbed for 30 minutes. Flip and cook for another 20 minutes, or until brown and crispy.
Pour the reserved marinade in a small saucepan and bring to a boil. Cook until it has reduced by about a third (5-10 minutes). Taste and adjust the seasonings. Baste the wings on both sides with the sauce. Let them cook for another 10 minutes, then baste again.
Serve with remaining sauce for dipping.
The Verdict:
The wings were very tasty. I really liked how the orange juice brightened up the flavor and kept them from tasting too sweet or heavy. I went with 2 tablespoons of sriracha, but they could have been a little hotter.
While the marinade boosted the flavor, the skin didn’t get as crisp as I would have liked. Maybe they need a coating of a little oil or a longer rest in the fridge.
It was mighty frigid for Turkey Day this year, so I went with this dead-simple spatchcocked turkey recipe that maximized the tender crispiness and minimized the amount of time that I had to spend outside shivering.
The Bird
1 whole fresh turkey (a 10-pound kosher bird in this case)
2 tablespoons sea or kosher salt
2 tablespoons poultry seasoning or rub (I used Penzey’s)
1 tablespoon raw or brown sugar
1 tablespoon Chesapeake Bay seasoning
1 teaspoon baking powder
Combine the salt, poultry seasoning, sugar, Chesapeake Bay seasoning, and baking powder in a shaker jar.
Clean and rinse the turkey, then pat it dry. Cut off the tail and any large bits of fat or loose skin (save along with the neck, backbone, and giblets for making gravy).
Place the bird on a cutting board with the breast side down and the back end facing you. Spatchcock (butterfly) the bird by cutting through the ribs on one side of the backbone with either a pair of kitchen shears or a sharp chef’s knife. The bottom couple of ribs are the worst to cut through. Once you are through those it goes pretty easily. Repeat on the other side and remove the backbone.
Open up the bird and make a small slice along the center of the keel bone. Press down on the outer edges of the breast until you hear the keel bone crack and the bird lies flat.
Rub both sides of the bird with the rub, making sure to work some under the skin. Refrigerate the turkey for a least an hour (overnight is best) uncovered to let the rub do its job and to dry out the skin a little.
The Cook
Set your grill up for an indirect cook over medium heat (350°F). On the Big Green Egg this means using about half a fire box full of lump charcoal, an inverted plate setter to diffuse the heat, and a drip pan to catch the fat.
Put the turkey on the grill skin side up and close the lid. Cook undisturbed for 1 hour. Check and rotate the grill if necessary to even out any hot spots. Close the lid and cook until the turkey reaches 160°F in the breast. Figure about 10 minutes per pound total cooking time. This 10-pound bird was done in just under 2 hours.
Remove the turkey to a cutting board and let rest for 10 minutes.
To carve, cut the back quarters away from the body at the hip joint. Separate the drumsticks from the thighs. Locate the bone that runs the length of the thigh and remove the meat on either side. Leave at least one of the drumsticks intact because there’s something wonderfully primal about eating one of these with your bare hands.
Find the joint connecting the wing and breast, and cut through it. Remove both wings. Cut the breast meat into two pieces, slicing along either side of breastbone. Slice the breast meat across the grain.
The Verdict:
Spatchcocking is a great way to grill any kind of poultry, but it makes cooking a turkey particularly easy and tasty. The bird cooks faster and more evenly so you don’t have to worry that the breasts will dry out before the dark meat is done.
I added a little baking powder the my rub to help crisp the skin and it worked wonders. The skin was so crisp that it practically crackled when I carved the breast.
Whatever you call it, this spice mix is hot. Portuguese sailors brought the piri piri (pepper pepper) with them to North Africa. There the locals incorporated it into their cooking and this fiery dish was born. These wings get a double dose of heat both from the berbere seasoning and shot of hot sauce.
6 chicken wings, separated at joints, discard tips
1 tablespoon sea or kosher salt
1 tablespoon raw or brown sugar
1 teaspoon garlic powder
1 teaspoon onion powder
1 teaspoon cracked black pepper
1 teaspoon True Lemon Crystallized Lemon 1/2 teaspoon Penzey’s Berbere Seasoning (cayenne red pepper, garlic, ginger, fenugreek, cardamom, cumin, black pepper, allspice, turmeric, cloves, Ceylon cinnamon, and coriander)
1/4 cup Nando’s Medium Peri-Peri Sauce
Make a rub by combining the salt, sugar, garlic, onion, pepper, lemon, and berbere in a small bowl. Dust the wings with the rub, making sure to cover both sides.
Set a cooling rack on a cookie sheet or jellyroll pan. Lay wings out on a rack and let them sit uncovered in the refrigerator for at least 2 hours, and preferably overnight to let the rub do its work and for the skin to dry out a bit.
Set your grill up for a raised direct cook at 350°F. On the Big Green Egg I used an extender to move the grate up to the level of the rim, putting the chicken further away from the heat.
When the grill is ready, put the wings on the grill and cook undisturbed for 30 minutes. Flip and cook for another 20 minutes, or until brown and crispy.
Baste the wings on both sides with the hot sauce. Let them cook for another 10 minutes, then baste again.
Serve with bleu cheese dressing and the reserved sauce for dipping.
New product – I enjoyed True Lemon’s powdered drink mixes this summer and was glad to see that they had come out with powdered flavorings too.
The crystallized lemon gave the rub a nice bite in addition to a fresh lemon taste.
I’m looking forward to trying out their Orange Ginger seasoning next.