Simple Chicken

simplechicken_P1020130

This is another take on the Chicken & Veggies dish that we tend to make a lot in late summer. I think this one is even a little easier. After spatchcocking the bird (which is easier than it sounds) and slicing the veggies, the cook pretty much takes care of itself.

If you get your grill started first and then prep everything while it heats up, you can put this meal on the table in about 90 minutes flat.

The Veggies
4 red potatoes, quartered
1 large zucchini, sliced
1 small yellow squash, sliced
1 medium onion, chopped
2 cloves garlic
1 medium tomato, chopped
1/4 cup olive oil
2 tablespoons balsamic vinegar
1 tablespoon Dijon mustard
1 teaspoon kosher salt
Fresh ground back pepper to taste

Make a vinaigrette by putting the salt and garlic in a food processor and pulse until the garlic is minced. Add the oil, vinegar, and mustard and give them a whirl until they are well-combined.

Lightly oil a disposable foil pan. Add the veggies and cover with the vinaigrette. Mix well.

The Bird

1 3-5 pound roasting chicken
2 tablespoons olive oil
1 to 2 tablespoons of your favorite barbecue rub (I used John Henry’s Texas Chicken Tickler for this batch)

Clean and rinse the chicken, then pat it dry. Place the bird in front of you, breast side down. Spatchcock the bird by cutting up through the backbone with either a pair of kitchen shears or a sharp chef’s knife.

Spread the bird open like a book and locate the keel bone that sits between the breasts. Nick it with a knife to get it to open up, but don’t cut all the way through. Flip the bird over and press down on the center of the bird until it lies pretty flat.

Rub both sides of the bird with olive oil and season with the rub, making sure to work some under the skin.

The Cook

Set your grill up for an indirect cook over medium-high (400°F). Set the pan full of veggies on the grill. Place a small wire rack or grill grate on top of the pan. Lay the chicken, skin side up, on the grate above the veggies.

Close the lid and cook the chicken and veggies for 45 minutes – no flipping, no basting, no checking. After 45 minutes, start checking to see if everything is done. The chicken is done when the juices run clear and the the temperature has reached 160°F in the breast and 180°F in the thigh. Pull the veggies if they finish before the chicken.

simplechicken_P1020126

When the chicken is done, remove it to a cutting board and let it rest for 10 minutes. Quarter the bird for serving.

Robust Ribs

ribs_P1020168

I’ve been waiting to try out Carnivore BBQ’s Robust sauce, and these baby back ribs were the perfect opportunity.

Preparation

These are minimalist ribs. I did little to prepare them except to remove the membrane on the back side of the ribs and rub a generous coating of Dizzy Pig’s Dizzy Dust into both sides of them about an hour before they went on the smoker.

The Cook

I set up my Big Green Egg for a direct cook at 225 to 250°F. I didn’t use a heat diffuser or drip pan, but I did set my grate on a Woo 2 to give me 8 inches of clearance above the firebox. Still, I wanted a low, even fire so I only filled my firebox about 3/4 of the way up and made sure I had a uniform layer of well- packed lump charcoal.

I lit the charcoal and once the fire was well-established across the entire firebox, I added a couple of chunks of smoking wood (guava, this time) and adjusted the vents to bring the temperature at the grate down to 225°F

I arranged the ribs bone side down on the grate, closed the lid, and let them smoke undisturbed for an hour. I misted the ribs with a 50/50 mixture of cider vinegar and Licor 43 (rum or bourbon would work just fine, too) and flipped them meat side down. I let them cook for another hour, flipped and misted. At hour 4, I just misted the ribs, but left them meat side up.

After the ribs had been on 4 1/2 hours total,  I started checking for doneness. Ribs are done when a full slab will “break” or almost fold in half and start to crack when you pick up one end with a pair of tongs. At this point the meat should also have pulled back from the bone at least half an inch from the end of the bones and a gentle tug on a couple of adjacent bones shows that they will come apart easily.

ribs_P1020148

These racks of ribs where done at about 4 hours and 45 minutes. At that point I brushed on a thick coating of  Carnivore BBQ’s Robust sauce and let them cook for another 15 minutes. I sauced them lightly again, removed them from the smoker, and let them sit 10 minutes before serving.

Results

I gotta say, these are the best ribs I’ve ever made, period. They were smokey and tender with a good bark and they pulled apart with little effort. The Carnivore BBQ’s Robust sauce provides a lot of flavor and heat. It hits you right up front, and then the heat lingers for quite a while. Not an overly hot sauce, but not too sweet or tangy either.  It really worked to bring all of the other flavors together and rounded them out nicely.

ribs_P1020160

Sous Vide Steak

Sous vide (a.k.a. hot tubbing)  is a technique where the meat is vacuum sealed in a plastic bag, put into a water bath, and brought to an almost-done temperature before being finished on the grill.

No matter how you like your steak done, this reverse sear is a great way to get more of your steak done the way you like it. By bringing the steak’s internal temperature close to the desired final level of done-ness first and then searing the outside, you get a nice, wide band of meat done the way you like it without much of a ring of gray meat around it.

I like my steak medium rare, so I sealed a couple of nice rib eyes in a FoodSaver bag and submerged it in a 100°F water bath. I checked every 15 minutes or so and added more hot water when the temperature dropped. After an hour the steaks were at the same temperature as the water.

Since medium rare is only 135°F, and the steaks are already almost there, all I had to do next was give them a good char.

I cranked my Big Green Egg up to nuclear temperature with all the vents open and did a final prep of the steaks – dusting them with some kosher salt and fresh ground black pepper and shaping them with my hands so that they are as compact as possible.

I put the steaks over the hottest part of the grill and closed the lid for 60 seconds of undisturbed searing. After a minute, I rotated them 90 degrees and gave them 30 seconds with the lid closed. I flipped the meat and repeated the process on the other side.

I pulled them from the grill, put the steaks on a warm plate and covered them gently with another one, and let them rest for about 10 minutes before serving.

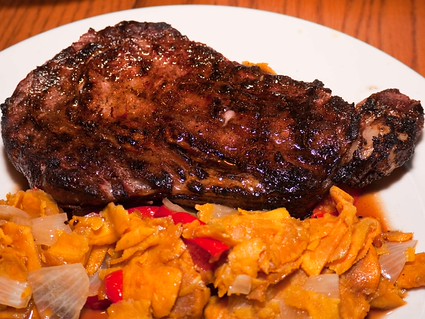
The verdict – probably one of the tastiest steaks I’ve ever had. There was plenty of  bright pink meat with a good, rich, beefy taste and a nice char on the outside. The texture was a little grainy, which might mean I had the water bath too hot. Next time I’ll use a bigger container so the temperature doesn’t drop when I add the steaks.

Mas Carnitas

The only thing wrong with the last batch of carnitas I made is that I didn’t make anywhere near enough. My little 4 pound roast didn’t even make 2 pounds of finished product and was gone in a flash. So this time I started13 pounds of pig.

Ingredients

2 boneless pork shoulder roasts (aka Boston Butt), about 13 pounds
2 cups chicken broth
2 cups water
2 cups orange juice
1/4 cup peanut oil
1 large onion, chopped
6 garlic cloves, crushed
2 tablespoon kosher salt

Directions

Set your grill or smoker up for at least an 8 hour cook over indirect heat at 300°F. On my Big Green Egg that means filling the firebox with lump charcoal and using the plate setter with a trivet on it to diffuse the heat. Once the Egg had stabilized at 300°F, I added a couple of chunks of hickory for smoke.

Cut pork into chunks, discarding any big pieces of connective tissue, but keeping all of the fat. Combine all of the ingredients in a large Dutch oven or other grill-safe pan (I use an old 12-quart Griswold No 10). If necessary, add more broth or water so that the pork is just covered in liquid.

Put the pot on the grill and let simmer, stirring occasionally, until liquid evaporates and the meat begins to brown. If there’s not enough fat rendered from the pork, add another 1/4 cup peanut oil. Continue cooking until the meat starts to get crisp. Check and stir about every 15 minutes until the meat is crispy, but not dry or burned.

Remove the Dutch oven from the heat. Cool the meat slightly and discard any pieces of fat or gristle.

The 13 pounds of pork butt cooked down to 8 pounds of carnitas. I pulled enough aside for a nice dinner, then sealed the rest away in 1-pound packages and tucked them into the freezer for later.

%d bloggers like this: